How to Tie a Water Knot and Build a Webbing Anchor

As a prelude to Water Knot instruction, a bit of mountain wisdom from Edward Whymper is appropriate: "There have been joys too great to be described in words, and there have been griefs upon which I have not dared to dwell, and with these in mind I say, climb if you will, but remember that courage and strength are naught without prudence, and that a momentary negligence may destroy the happiness of a lifetime. Do nothing in haste, look well to each step, and from the beginning think what may be the end." ~Edward Whymper Scrambles Amongst the Alps.

The most used, and most useful, knot in webbing is the WATER KNOT or OVERHAND BEND, which is tied by 're-threading'. This is used to join (bend) two ends of webbing together, often two ends of the same piece to make a loop or sling.

Webbing (aka "web" or "sling", british "tape") is used primarily to rig anchors and is usually left behind, thus we are not concerned with getting the knots untied after loading, and VERY interested in the knots staying tied.
Webbing ties differently than rope because it is flat. For the most part, we use the Overhand Knot and variations of the overhand, because it lies flat in webbing. The Figure Eight knot (and higher order) does not lay flat, which makes the knot ugly, hard to inspect, compromises strength, and tends to make it loosen up and untie—an undesirable attribute. Let's stick with overhand-based knots.
IMPORTANT: All knots in webbing MUST be tightened carefully, and the tails on your knots 3" (7cm) long. For knotted slings, put your foot in the sling and pull hard to 'set' the knot. Webbing knots that are not well 'set' tend to spontaneously untie.
How to Tie a Water Knot (aka Ring Bend or Overhand Bend)

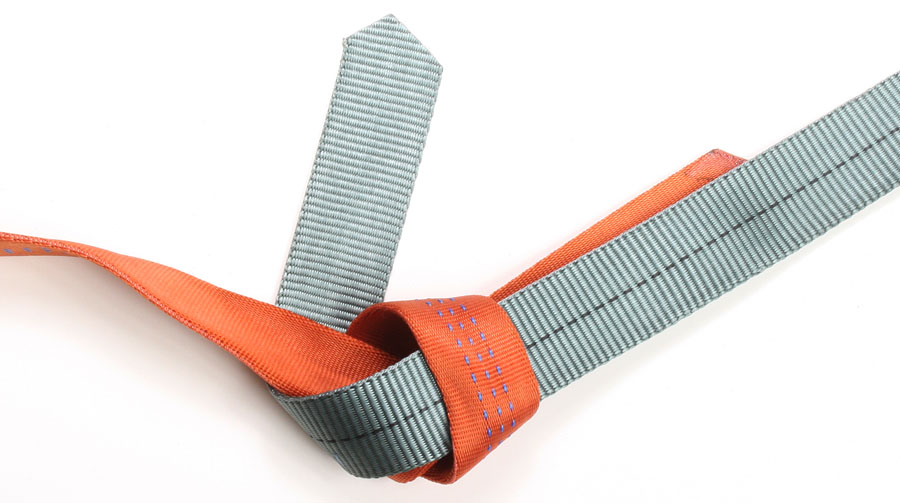
Beginning the Tracing of the Overhand Knot
[A]. Tie an overhand knot in one END. Turn it over.
Tracing the Water Knot
[B]. With the other END, trace-back the path of the overhand knot. (We turned it over so we would trace around the outside). Make sure the tracing is complete.

Complete Followthrough of the Water Knot
[C]. Adjust the knot so both tails are at least 3", and pull tight. Tying a water knot is that easy.
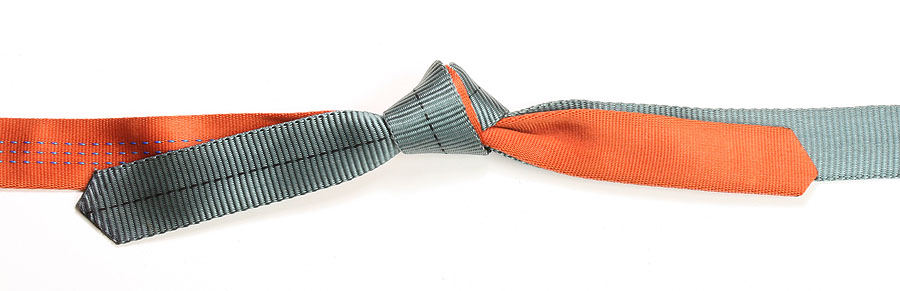
A finished Water Knot
Uses: The Water Knot is used often for joining two ends of webbing, either for making a sling (a loop of webbing), or for making a piece of webbing longer.

A loop in webbing using the Water Knot
A loop in webbing (aka a "sling" or (British) "runner") is made by tying a Water Knot.
BASIC RIGGING WITH A WATER KNOT
To delve into how the Water Knot is used, we will start on "RIGGING". Rigging is preparing an anchor to accept the rappel rope.
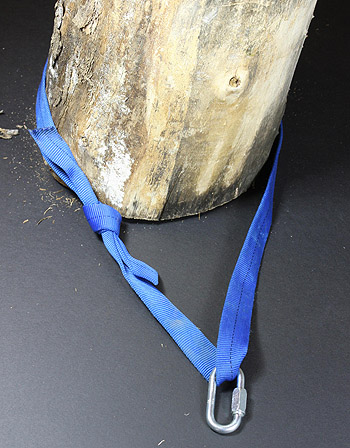
RIGGING #1: SLING AROUND A TREE, LOG OR ROCK
Perhaps the most basic webbing anchor. Toss your webbing around the tree, slip the metal ring on and join the ends by tying a Water Knot.

Sling Anchor
RIGGING #2: WRAP TWICE, PULL ONCE

Wrap 2 Pull 1 Anchor
For this webbing anchor configuration, the webbing is passed around the tree twice, the ring slipped on the webbing and the ends joined.
Uses:
A Wrap 2, Pull 1 is useful to control the position of the webbing;
it may be important for the webbing anchor to stay at the base of the tree, to maximize the strength of a smallish-tree anchor;
it may be desirable for the webbing anchor to stay in a specific location higher in the tree, to improve the pulling angle (on a largish tree); and
on a rock, you may want to assure the webbing anchor stays in a specific location on the rock.
In some cases, more wraps may be desirable to better secure the position of the webbing.